
Availability Patterns: Active-Passive vs. Active-Active
Issue #112: System Design Interview Roadmap • Section 5: Reliability & Resilience
What We'll Build Today
In this hands-on lesson, you'll create a complete demonstration system featuring:
Interactive Web Dashboard - Real-time visualization of both availability patterns
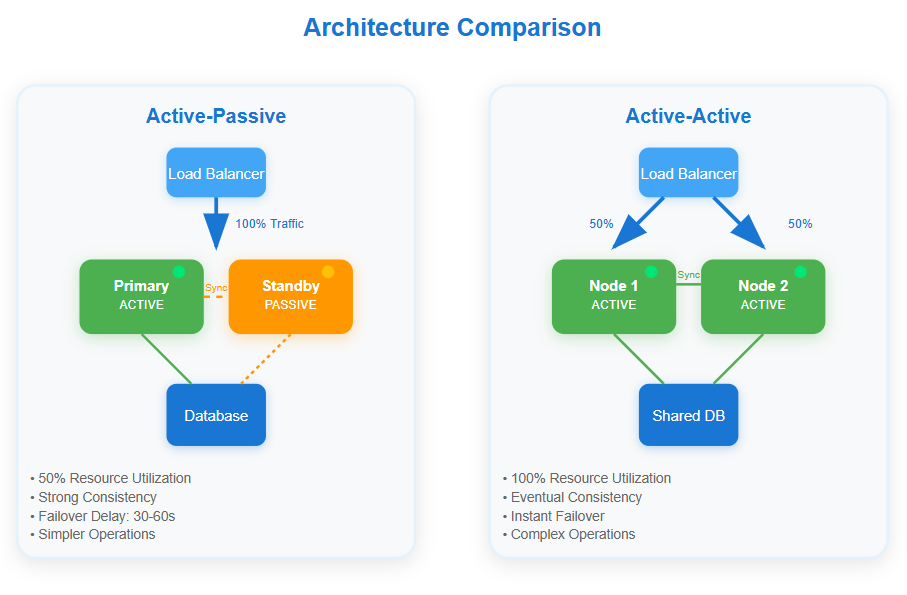
Active-Passive Setup - Primary server with standby backup and automatic failover
Active-Active Setup - Load-balanced nodes sharing traffic equally
Failure Simulation - Click-button failure scenarios to see patterns in action
Live Metrics - Request counts, response times, and availability percentages
Load Balancers - nginx configurations for both patterns
By the end, you'll understand exactly when to choose each pattern and see their real-world trade-offs in action.
The Split-Second Decision That Cost $50 Million
When a major streaming platform's primary data center went down during the season finale of their most popular show, their active-passive setup took 47 seconds to detect the failure and switch to the backup. Those 47 seconds translated to 8 million frustrated viewers and a cascade of social media complaints that damaged their brand for months.
The competitor across the street? Their active-active architecture kept streaming without missing a beat. Users never knew anything happened.
Today, we'll dissect these two fundamental availability patterns that separate resilient systems from fragile ones, and you'll build both to understand their real-world trade-offs.
What We'll Master Today
Understanding when your system needs instant failover versus cost-effective redundancy, implementing health checks that actually detect meaningful failures, and designing for the failure scenarios that matter most to your users.
Active-Passive: The Sleeping Giant Pattern
