
Database Sharding: Horizontal Partition Visualization
Issue #22 of "System Design Interview Roadmap" - Part II: DATA STORAGE
Last week at a tech conference, I watched a senior architect struggle to explain why their system was experiencing hot spots despite implementing sharding. The room grew tense as they fumbled through vague explanations about "uneven data distribution." What they lacked wasn't technical knowledge—it was the visual framework to communicate sharding concepts effectively. Today, we'll bridge that gap.
The Bottleneck Problem
Imagine you're building a photo-sharing application that suddenly goes viral. Your single database server chokes under the load of 10 million uploads per day. Each time a celebrity posts a photo, your system grinds to a halt as millions of users attempt to view it simultaneously. Sound familiar?
This pattern emerges across industries: social networks, e-commerce platforms, financial systems—all face similar bottlenecks. The solution? Database sharding.
Sharding Demystified
At its core, sharding is horizontal partitioning—dividing your data across multiple database servers, with each server holding a subset (shard) of your complete dataset. Unlike vertical partitioning (splitting by columns), sharding distributes entire rows across different physical machines.
But the devil is in the distribution details.
The Sharding Key: Your Most Critical Decision
The sharding key (partition key) determines which shard stores which data. This seemingly simple choice dramatically impacts your system's performance, scalability, and operational complexity.
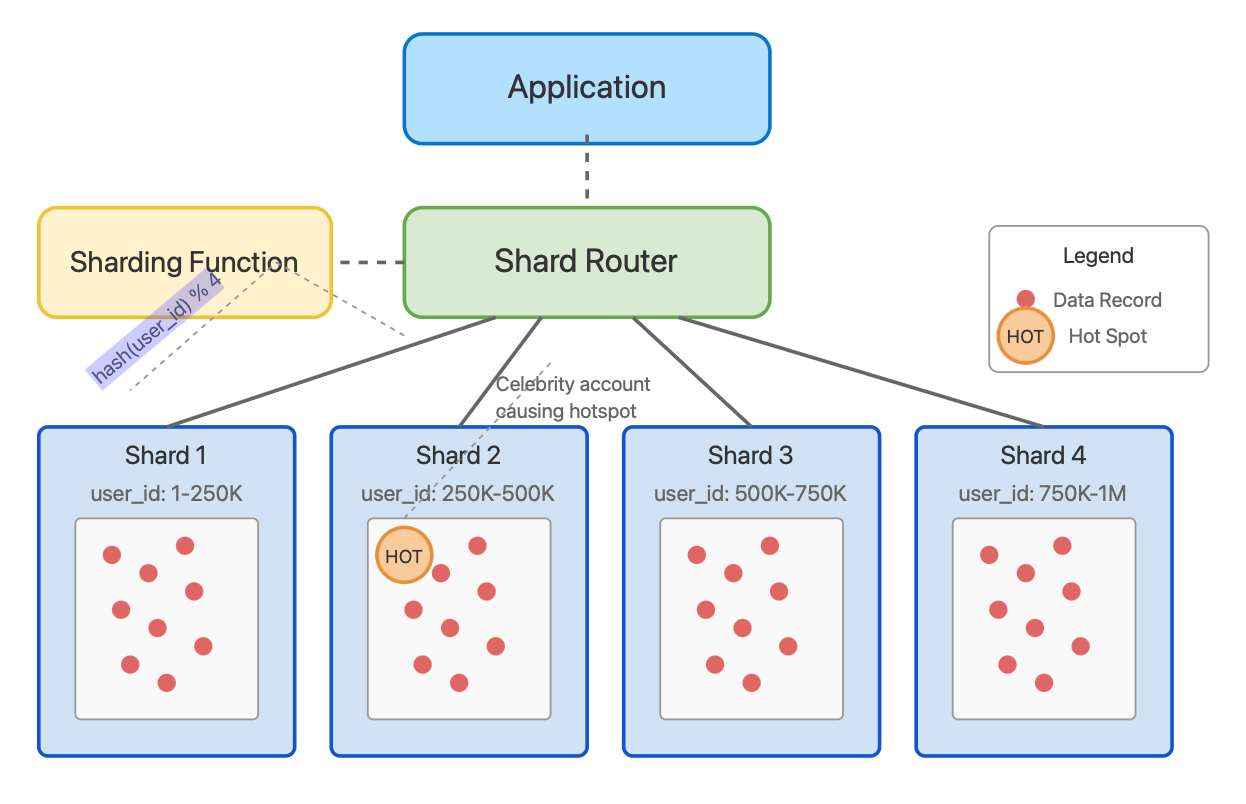
Database Sharding Visualization
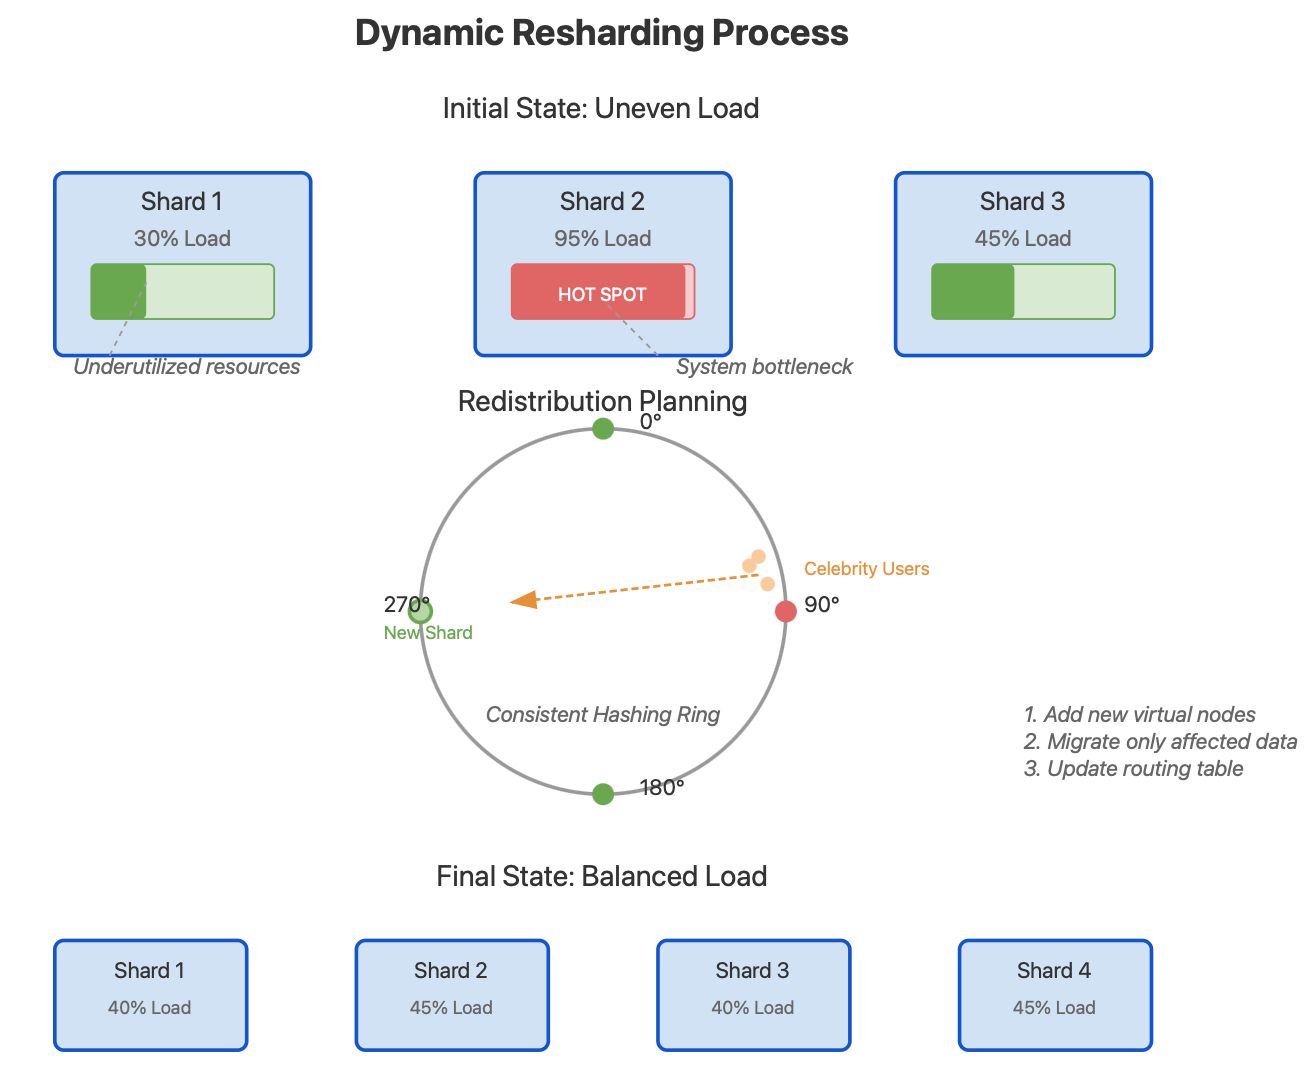
Dynamic Resharding Visualization
Consider a social media application with a billion users. How would you shard?
Range-based sharding: Dividing by user_id ranges (e.g., users 1-250K on shard 1, 250K-500K on shard 2)
Pro: Simple to implement and understand
Con: Vulnerable to hot spots (imagine a celebrity in shard 2 with millions of followers)
Hash-based sharding: Using hash(user_id) % number_of_shards
Pro: Evenly distributes data
Con: Difficult to scale—adding a new shard requires rehashing and moving a large percentage of data
Directory-based sharding: Maintaining a lookup service that knows which shard contains which data
Pro: Flexible routing
Con: Directory becomes a single point of failure
Consistent hashing: Placing shards on a virtual ring, assigning data to the nearest clockwise shard
Pro: Adding/removing shards requires minimal data movement
Con: Implementation complexity
The Hidden Complexity: Resharding
What happens when your system outgrows your initial sharding design? This is where many architectures fail—the resharding process.
Consistent Hashing Implementation in Go
Code. : Download go file for full code here or click on image to download file.

Resharding—the process of redistributing data when adding or removing shards—can bring a production system to its knees if not carefully planned. Our visualization shows how consistent hashing minimizes the data that needs to be moved during resharding.
Avoiding Hot Spots: The Secret Most Engineers Miss
The most common sharding pitfall occurs when related data that's frequently accessed together ends up on different shards. Consider an e-commerce site where product and inventory data are separated. Every product page load requires cross-shard joins, creating a performance nightmare.
The solution? Co-location of related data.
For our social media example, we could shard by both user_id for profile data AND by post_id for content. However, this means a user's profile and posts live on different shards. A better approach might be to keep all of a user's data together, acknowledging that some shards (celebrities) will be hotter than others.
Practical Implementation
Let's examine a production-ready consistent hashing implementation in Go that handles resharding gracefully:
Monitoring Shard Health: Beyond Metrics
Most engineers monitor simple metrics like queries-per-second or disk usage. The real challenge is identifying shard imbalance before it becomes critical. Let me share a monitoring approach that's saved my team countless late-night incidents.
Instead of focusing solely on individual shard performance, track the standard deviation of query times across your entire shard cluster. When this value begins to rise, it indicates growing imbalance—often before any single shard hits alarming thresholds.
shard_imbalance = standard_deviation([shard1_qps, shard2_qps, ...]) / average_qpsA healthy system typically maintains a shard imbalance under 0.3. Values approaching 0.5 warrant investigation, while anything above 0.7 indicates urgent rebalancing is needed.
Real-World War Story: When Sharding Goes Wrong
At a unicorn fintech startup, we once implemented range-based sharding for a transaction database, with each shard handling a specific ID range. The system performed beautifully in testing and early production.
Then Black Friday hit.
Customers with IDs in a particular range (all created during a previous marketing campaign) suddenly became extraordinarily active. A single shard received 80% of the transaction volume while others sat nearly idle. The overloaded shard eventually failed, cascading into a system-wide outage.
The lesson? Test with realistic data patterns, not just synthetic loads. Analyze your actual user behavior before deciding on a sharding strategy.
Dynamic Sharding: The Next Level
Sophisticated systems implement dynamic sharding—automatically detecting hot spots and redistributing data without engineer intervention. Netflix's Dynomite and Google's Spanner employ versions of this approach.
The key insight isn't the technology but the methodology: continually reassess your shard distribution based on actual usage patterns. Even with the most elegant consistent hashing implementation, real-world data access is rarely perfectly uniform.
Architectural Best Practices
Design for resharding from day one - Build your schema and application logic assuming data will move between shards.
Separate hot and cold data - Consider multiple sharding strategies for different data types (e.g., shard active users differently from inactive ones).
Implement graceful degradation - When a shard becomes overloaded, have fallback strategies like read-only mode or temporary caching.
Use shard-aware connection pooling - Maintain separate connection pools for each shard to prevent a single slow shard from consuming all database connections.
Consider hybrid approaches - Combine consistent hashing for most data with targeted strategies for known hot entities.
Practical Exercise: Implementing Shard-Aware Routing
The Go code I provided earlier implements consistent hashing, but how do we integrate it with a real application? Here's the critical piece many engineers miss: application-level routing awareness.
Add this middleware layer to your API servers to route requests intelligently:
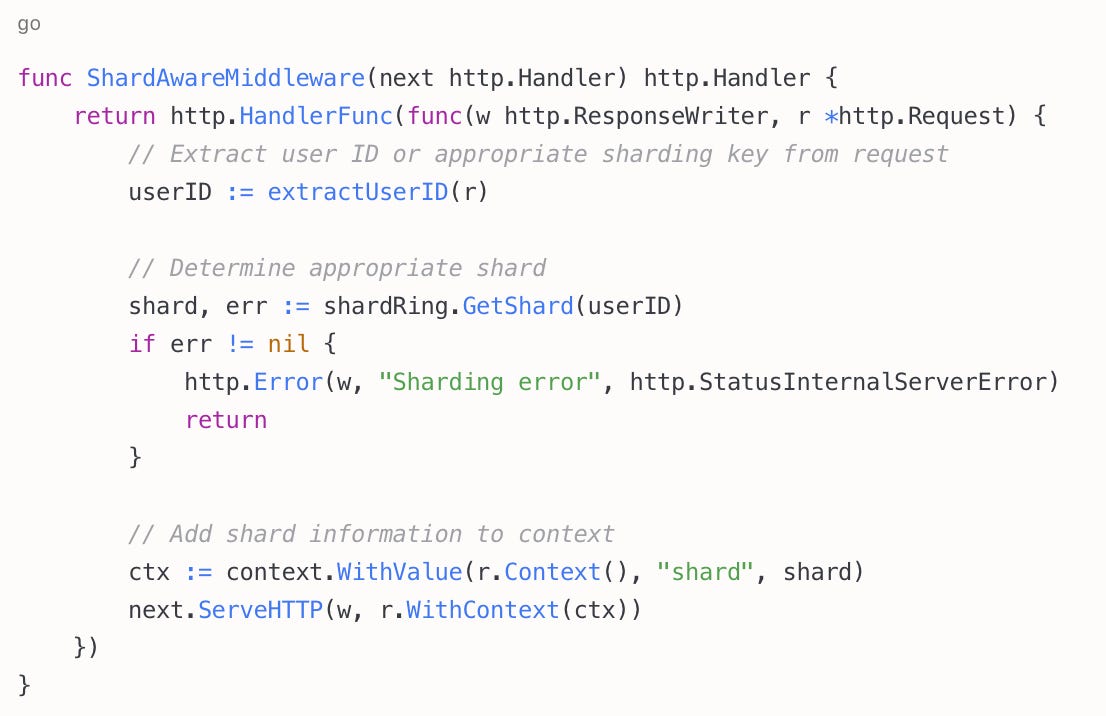
This ensures your application layer makes intelligent routing decisions before requests hit your database layer, distributing load appropriately across your infrastructure.
For now, remember: sharding isn't just a technical implementation—it's an ongoing process of balance. The best systems aren't those that distribute data perfectly from day one, but those designed to adapt as usage patterns evolve.