
Scaling the Load Balancer Layer: From Bottleneck to Battle-Ready
The $10M Problem You Didn’t See Coming
Your AI agent service just hit 50M daily requests. Celebrating? Not quite. Your monitoring dashboard shows a terrifying flatline—not downtime, but a ceiling. Every request takes 200ms longer than it should. The culprit? That single, powerful load balancer you trusted is now maxed out at 100% CPU, creating a traffic jam before requests even reach your beautifully scaled application servers.
This is the “hidden single point of failure” that takes down unicorns. When Cloudflare went down in 2020, it wasn’t their edge servers—it was a configuration issue in their load balancing layer. When you scale horizontally by adding application servers but keep a single load balancer, you’ve just moved the bottleneck up one layer.
The Three-Tier Scaling Arsenal

DNS Round Robin: The Budget Superpower
DNS round robin distributes traffic by returning different IP addresses for the same domain name. When a client queries your domain, the DNS server rotates through a list of load balancer IPs. It’s elegantly simple: no single load balancer sees all traffic, and you can add capacity by spinning up more load balancers and updating DNS records.
The catch? DNS caching. A user’s browser might cache an IP for hours, meaning if that load balancer dies, the user experiences downtime until their DNS cache expires. And there’s no intelligence—a dying load balancer with 10% capacity still gets 33% of traffic if you have three load balancers.
Real-world use: GitHub uses DNS round robin as their first layer of traffic distribution, combined with health checks at the application layer to handle failures gracefully.
High Availability Pairs: The Heartbeat Protocol
An HA pair uses two load balancers—one Active, one Passive—sharing a virtual IP address. They communicate via heartbeat packets. If the active node fails, the passive node detects the missing heartbeat within seconds and takes over the virtual IP through gratuitous ARP, making the failover nearly invisible.
Active-Active HA is more sophisticated: both nodes handle traffic simultaneously, with each monitoring the other. If one fails, the survivor absorbs the full load. This maximizes resource utilization but requires careful session management and state synchronization.
The limitation? You’re still constrained by the capacity of a single node (in Active-Passive) or two nodes (in Active-Active). This solves availability but not scalability beyond 2x.
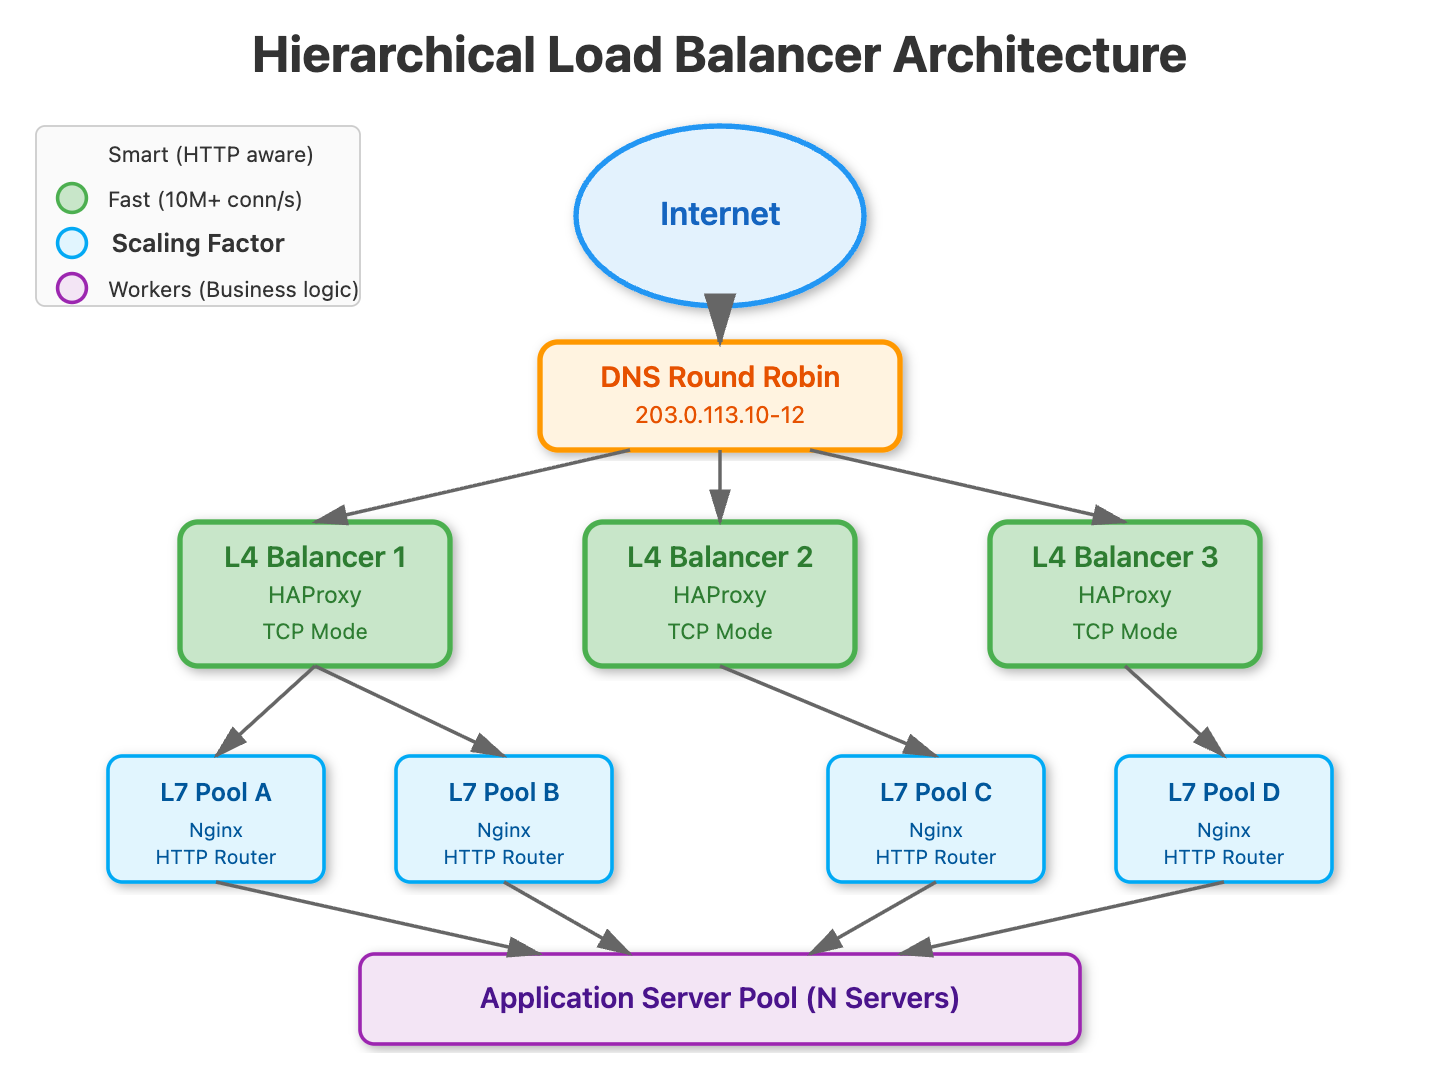
L4 + L7 Hierarchical Splitting: The Nuclear Option
This is how hyperscalers think. Layer 4 load balancers (operating at TCP/UDP level) are blazingly fast—think 10M+ concurrent connections—but dumb. They forward packets based on IP and port with minimal CPU overhead. Layer 7 load balancers (operating at HTTP level) are intelligent—they can route based on URL paths, headers, and cookies—but CPU-intensive.
The pattern: deploy a small fleet of ultra-fast L4 load balancers as the first tier, using DNS round robin or BGP anycast. Each L4 balancer distributes to a pool of L7 balancers, which then route to application servers. The L4 layer scales your traffic handling capacity; the L7 layer scales your routing intelligence.
Netflix uses this exact pattern. Their EVCache (L4) handles the raw packet forwarding for hundreds of millions of connections, distributing to Zuul (L7) instances that handle intelligent routing, authentication, and dynamic traffic shaping.
The Decision Matrix
Choose DNS Round Robin when you need quick, cost-effective horizontal scaling and can tolerate DNS caching delays. Use HA pairs when availability is critical but your scale requirements fit within 2x single-node capacity. Deploy L4+L7 hierarchical balancing when you’re operating at internet scale and need both raw throughput and intelligent routing.
The real lesson? Your load balancer will become the bottleneck. Plan for it before your 3am pager goes off.
Implementation Playbook
Git Repository :
https://github.com/sysdr/sdir/tree/main/lb-scaling
Quick Start Checklist (Experienced Users)
✓ Verify Docker and Docker Compose installed
✓ Run
bash setup.shand wait ~2 minutes✓ Test with
curl http://localhost:8000✓ Observe request distribution across servers
Step-by-Step Walkthrough
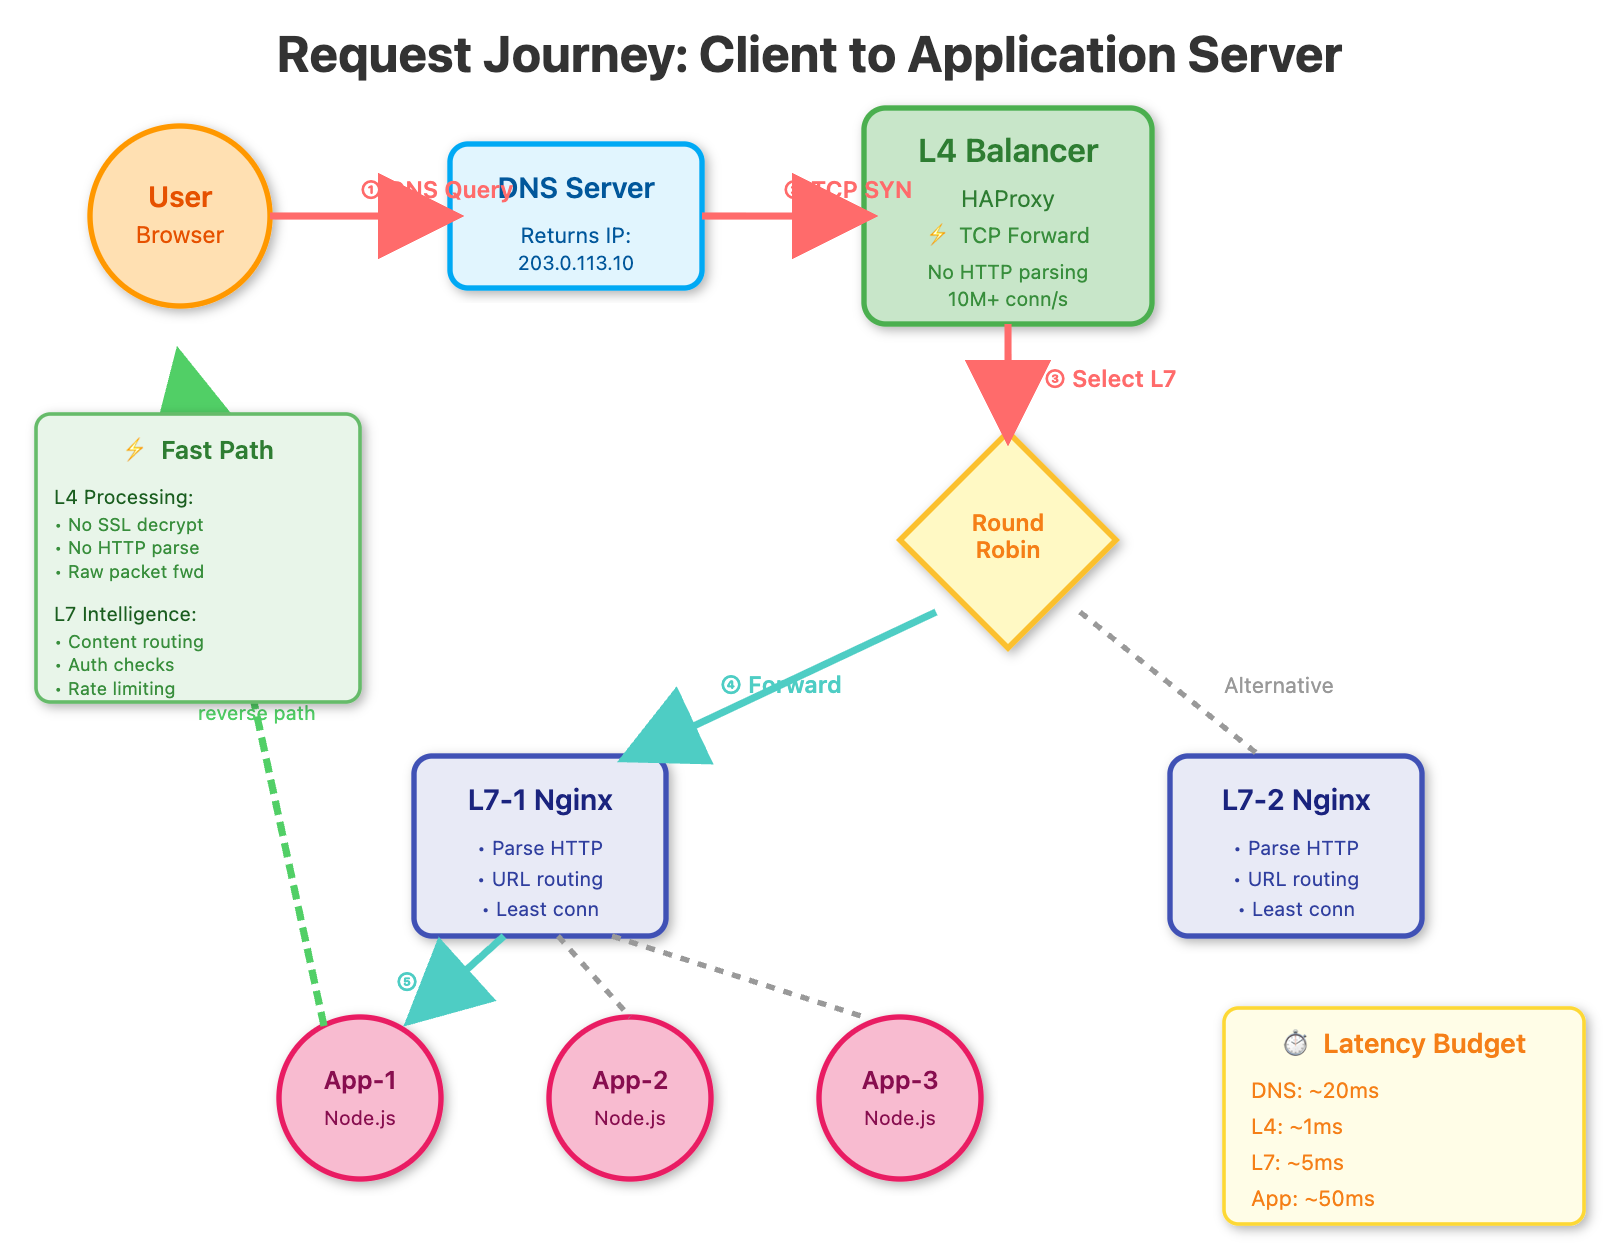
Step 1: Understanding the Layer 4 Entry Point
The L4 load balancer (HAProxy) is configured for raw TCP forwarding. It doesn’t inspect HTTP—just forwards packets.
# L4 Configuration Pattern
frontend l4_frontend
    bind *:80          # Accept on port 80
    mode tcp           # Layer 4 operation
    default_backend l7_pool

backend l7_pool
    balance roundrobin # Simple round-robin
    server l7-1 l7-balancer-1:8080 check
    server l7-2 l7-balancer-2:8080 check
Verification: After setup, check L4 stats:
docker exec lb-scaling-demo-l4-balancer-1 echo “show stat” | \
  socat stdio /var/run/haproxy.sock
Step 2: Configuring Intelligent L7 Routing
Each L7 balancer (Nginx) adds HTTP intelligence. They use least_conn instead of round-robin to balance based on active connections, not just request count.
# L7 Configuration Pattern
upstream app_pool {
    least_conn;  # Send to server with fewest connections
    server app-server-1:3000;
    server app-server-2:3000;
    server app-server-3:3000;
}

location / {
    proxy_pass http://app_pool;
    proxy_set_header X-Load-Balancer “L7-1”;
}
Verification: Hit the system and observe which L7 balancer handled your request:
curl -s http://localhost:8000 | jq ‘.loadBalancer’Step 3: Application Server Response Tracking
Each app server includes metadata showing the complete routing path:
// Response includes:
{
  “server”: “app-server-2”,           // Which app server
  “loadBalancer”: “L7-1”,             // Which L7 balancer
  “requestNumber”: 42,                // Server’s request count
  “timestamp”: “2025-10-15T12:34:56”
}
Step 4: Simulating Scale and Observing Distribution
Run the test script to see round-robin at L4 and least-conn at L7:
cd lb-scaling-demo
./test-load-distribution.sh
You’ll see output like:
Request 1: L7-1 -> app-server-1
Request 2: L7-2 -> app-server-2
Request 3: L7-1 -> app-server-3
Request 4: L7-2 -> app-server-1
Step 5: Testing Failure Scenarios
Stop one L7 balancer and observe automatic failover:
docker-compose stop l7-balancer-2
# Now all traffic routes through L7-1
curl -s http://localhost:8000 | jq ‘.loadBalancer’
# Should only show “L7-1”

docker-compose start l7-balancer-2
# Traffic resumes balancing across both
Step 6: Scaling Horizontally
To add capacity, edit docker-compose.yml and add another L7 balancer:
l7-balancer-3:
  build:
    context: ./l7-balancers
  command: nginx -c /etc/nginx/nginx-2.conf -g “daemon off;”
  networks:
    - lb-network
Then update the L4 backend pool in haproxy.cfg:
backend l7_pool
    balance roundrobin
    server l7-1 l7-balancer-1:8080 check
    server l7-2 l7-balancer-2:8080 check
    server l7-3 l7-balancer-3:8080 check  # New
Restart: docker-compose up -d --build
Performance Benchmarking
Use Apache Bench to stress test:
# Single-threaded baseline
ab -n 1000 -c 10 http://localhost:8000/

# High concurrency test
ab -n 10000 -c 100 http://localhost:8000/
Observe:
Requests per second throughput
Connection time distribution
Failed requests (should be 0)
Production Considerations
Health Checks: In production, implement active health checks at both layers:
L4: TCP connection checks every 2s
L7: HTTP endpoint checks every 5s with retry logic
Session Persistence: For stateful applications, enable sticky sessions at L7:
upstream app_pool {
    ip_hash;  # Same client IP -> same server
    server app-server-1:3000;
}Monitoring: Export metrics from both layers:
L4: Connection count, backend availability
L7: Request rate, latency percentiles, error rates
DNS Round Robin: In production, add multiple L4 balancers with DNS round robin:
lb.example.com -> 203.0.113.10  (L4-1)
lb.example.com -> 203.0.113.11  (L4-2)
lb.example.com -> 203.0.113.12  (L4-3)
Amazingly explained!